The simple answer
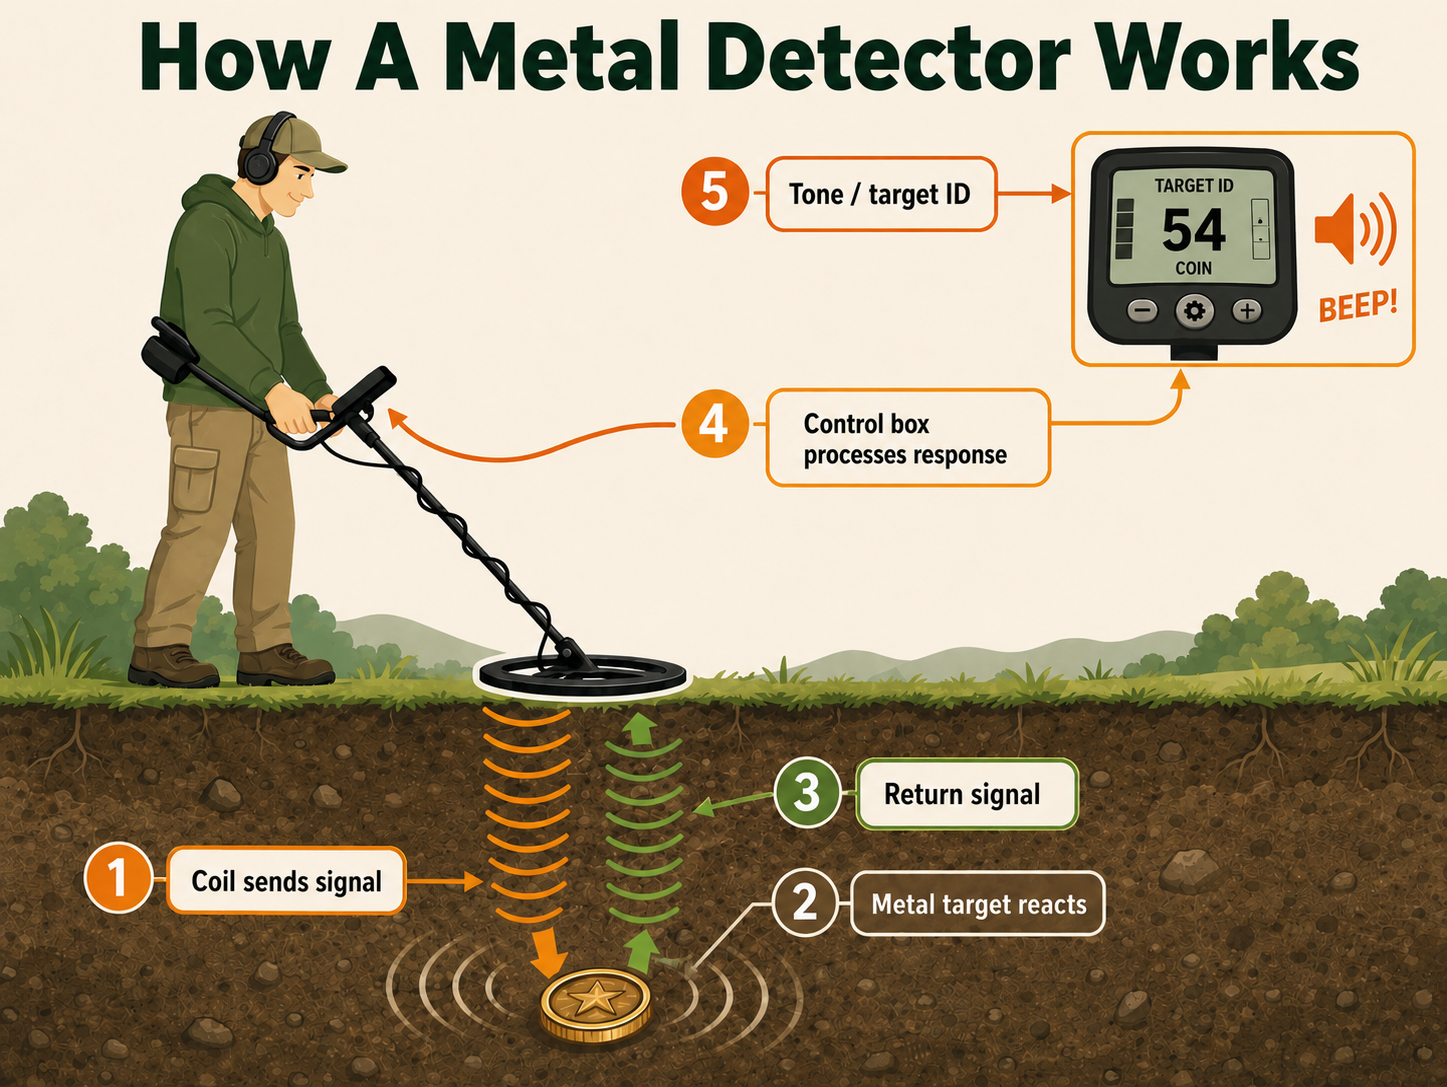
A metal detector works by using a coil to send an electromagnetic field into the ground. When that field hits a metal object, the object creates a response. The detector receives that response, analyses it, and alerts you with sound, numbers or visual information on the screen.
1. The coil sends a signal
The search coil creates an electromagnetic field that passes into the ground.
2. Metal reacts
Metal objects disturb the field and create their own response signal.
3. The detector listens
The coil receives the response and sends it to the control box.
4. You get information
The detector gives you tones, numbers, depth clues and target ID information.
Beginner metal detecting guide
How Does A Metal Detector Work?
A simple, no-nonsense explanation of what is actually happening when your detector beeps, why some targets sound better than others, and why your machine sometimes lies to you.
You will understand why some targets sound good, why some sound awful, why wet sand can make a detector behave like it has had three cans of energy drink, and why a deep hammered coin might not scream at you like a modern pound coin.
What is actually happening under the coil?
The round or oval part at the bottom of your detector is called the search coil. This is the part that does the real work. As you sweep the coil over the ground, it sends an electromagnetic field down into the soil, sand or whatever surface you are searching.
If there is no metal under the coil, there may be no target response. It carries on quietly, or as quietly as your chosen settings allow.
When the electromagnetic field hits a metal object, something changes. The metal object becomes energised by the field and produces its own small response. The search coil picks up that response and sends the information back up to the control box.
The control box then does the clever bit. It looks at the response and tries to work out what sort of target it might be. Is it iron? Is it copper? Is it silver? Is it a bottle cap pretending to be a good target again? The machine cannot know for certain, but it can make an educated guess based on the signal it receives.
This is why I always say a detector does not tell you exactly what is in the ground. It gives you clues. Your job is to learn how to read those clues.
Beginner thought:
A metal detector is not a magic treasure scanner. It is more like a very clever clue-giving machine. The better you get at understanding those clues, the better your finds will become.
The main parts of a metal detector
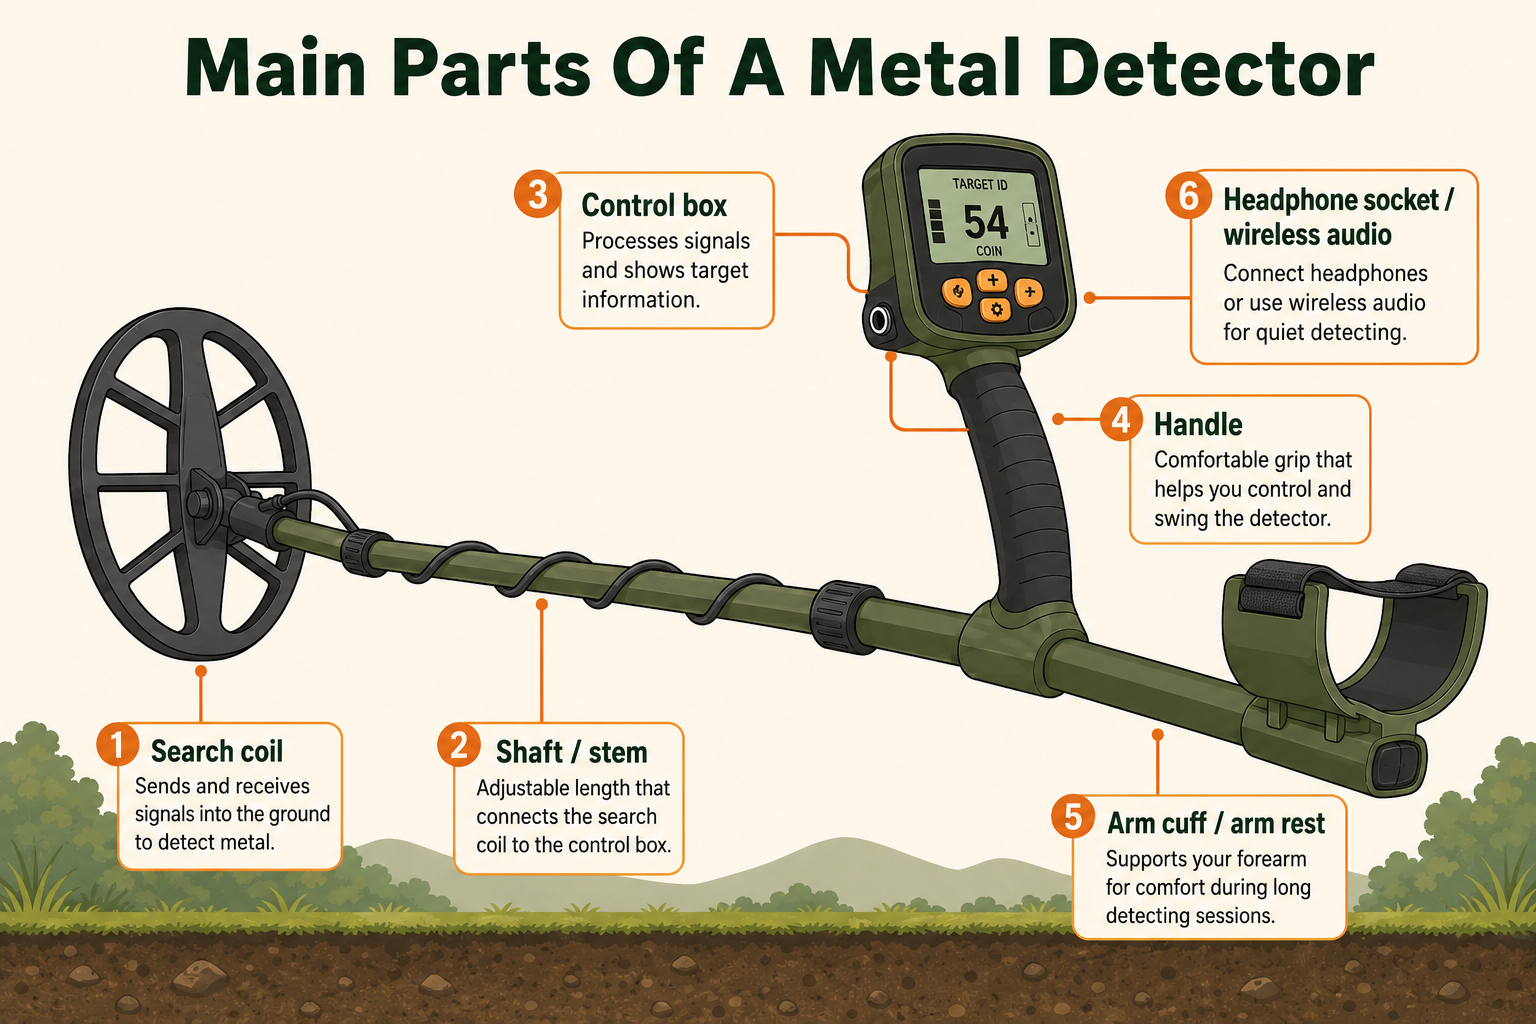
Most hobby metal detectors look slightly different, but the basic parts are usually the same. Once you understand what each part does, the whole machine becomes much less mysterious.
| Part | What it does | Why it matters to a beginner |
|---|---|---|
| Search coil | Sends the electromagnetic field into the ground and receives the response from metal targets. | The size and type of coil affects coverage, separation, sensitivity and depth. |
| Control box | Processes the signal and turns it into audio tones, numbers and screen information. | This is where your settings, target ID and display information usually live. |
| Shaft or stem | Connects the coil to the control box and allows the detector length to be adjusted. | A comfortable length helps you swing properly and reduces strain. |
| Armrest and handle | Help support the detector while you sweep the coil across the ground. | Comfort matters more than beginners realise, especially after a few hours. |
| Battery | Powers the detector and its electronics. | Flat batteries can end a good day early. Always check charge before you go. |
| Headphone socket or wireless audio | Lets you hear the detector’s tones more clearly. | Good audio helps you hear faint signals and annoy fewer people around you. |
The search coil: the part that talks to the ground
The search coil is the part most beginners underestimate. They look at the screen, the buttons and the fancy features, but the coil is the part actually interacting with the ground.
Inside the coil are wires arranged in a particular pattern. These wires help create and receive electromagnetic signals. Different coil designs behave in different ways, which is why you will hear detectorists talking about DD coils, concentric coils, small coils, stock coils, large coils and specialist coils.
You do not need to obsess over coil types on day one. Your stock coil will usually be enough to get started. But it is useful to understand the basic trade-off.
Smaller coils
Smaller coils are usually better in trashy areas because they can separate targets more easily. They cover less ground, but they can help you pick good targets out from junk.
Larger coils
Larger coils cover more ground and can sometimes help with depth on larger targets. The downside is they can feel heavier and struggle more in very trashy ground.
Stock coils
The coil that comes with the detector is normally chosen as an all-rounder. For most beginners, it is the right place to start before buying extras.
The important thing is not to buy a pile of coils before you understand your detector. Learn the machine first. Once you know where it struggles, then you can decide whether a different coil would genuinely help.
VLF, multi-frequency and pulse induction explained
When you start researching detectors, you will come across terms like VLF, multi-frequency and pulse induction. They sound complicated, but the basic idea is not too bad once you strip away the marketing.
| Technology | Plain English explanation | Good for | Beginner note |
|---|---|---|---|
| VLF | Very Low Frequency detectors use a continuous signal and are the most common type for hobby detecting. | Coins, relics, fields, parks, pasture and general detecting. | Most beginners will start with a VLF or multi-frequency VLF-style detector. |
| Single frequency | The detector operates on one main frequency at a time. | Simple detecting, specific target types, budget machines. | Still perfectly usable, but less flexible than modern simultaneous multi-frequency machines. |
| Multi-frequency | The detector uses more than one frequency, either selectable or simultaneously, depending on the model. | Mixed targets, wet sand, varied ground, beginners wanting flexibility. | A strong choice if you want one detector for different places. |
| Pulse induction | PI detectors send powerful pulses into the ground and listen for the decay of the response. | Saltwater beaches, mineralised ground, deep targets and specialist detecting. | Powerful, but often less beginner-friendly for normal UK field detecting because discrimination can be more limited. |
In plain English, most beginners should not panic about this. For general UK detecting, a good modern VLF or simultaneous multi-frequency detector will suit most people better than jumping straight into specialist machines.
What does frequency mean on a metal detector?
Frequency is one of those terms that gets thrown around a lot in detecting conversations. People say things like “this detector runs at 15 kHz” or “that machine is better on small gold because it runs higher frequency”.
Without melting your brain, frequency is basically how fast the detector’s signal is cycling. It affects what kind of targets the detector is naturally more sensitive to.
Frequency in simple terms
| Frequency type | Usually better for | Trade-off |
|---|---|---|
| Lower frequency | Larger, deeper targets and some higher-conductive targets. | Can be less sensitive to tiny or very thin targets. |
| Higher frequency | Smaller targets, thin coins, tiny jewellery and lower-conductive targets. | May not punch as deep on larger objects in some conditions. |
| Multiple frequencies | A wider mix of target sizes and ground types. | More technology can mean more settings to learn, depending on the detector. |
The mistake beginners make is thinking there is one perfect frequency. There is not. It depends on what you are searching for, where you are detecting, how mineralised the ground is, how deep the target is, what metal it is made from, and even how it is sitting in the ground.
A tiny hammered silver coin on edge does not behave like a big copper penny lying flat. A gold ring does not behave like an iron nail. A rusty bottle cap may try its absolute best to sound like something much more exciting, because bottle caps are evil little things like that.
How does target ID work?
Target ID is the number or visual information your detector gives you when it thinks it has found something. On many modern detectors, you will see a number appear on the screen when you pass over a target.
Beginners often fall into the trap of treating target ID numbers like gospel. They are not. They are clues.
The detector is trying to estimate the target based on the response it receives. Conductivity plays a big part. Highly conductive targets often read differently from lower-conductive targets. Iron behaves differently again. But the detector is not looking at the object with a tiny underground camera. It is making a judgement from signal behaviour.
Things that can affect target ID
- The type of metal.
- The size of the target.
- The shape of the target.
- How deep it is.
- Whether it is flat, tilted or on edge.
- How mineralised the soil is.
- Whether there is iron or junk nearby.
- The detector settings.
- The coil size and sweep speed.
This is why the same coin may not always give exactly the same number. It may be deeper, tilted, masked by iron or sitting in horrible ground. The target ID can jump around, especially on deep or awkward targets.
A shallow modern coin might give a lovely confident number. A deep hammered coin might whisper at you and give a less convincing response. If you only dig perfect numbers, you will miss things.
The screen helps, but your ears matter. Learn the tones as well as the numbers.
Why does a metal detector make different sounds?
The audio is one of the most important parts of detecting. In fact, many experienced detectorists rely more on the sound than the screen.
Most detectors use different tones to give you clues about the target. A low grunt might suggest iron. A mid tone might suggest foil, buttons, gold rings or certain lower-conductive targets. A high tone might suggest copper or silver coins, depending on the machine and settings.
That sounds straightforward, but detecting likes to keep you humble. Some rubbish gives nice tones. Some good targets give iffy tones. Some iron can produce a false high tone, especially if it is rusty, oddly shaped or near the edge of the coil.
Low tones
Often linked with iron or rejected targets, but this depends on settings and detector model.
Mid tones
Can include foil, lead, buttons, gold rings, small hammered coins and other awkward but interesting targets.
High tones
Often linked with higher-conductive targets like copper and silver, but some junk can sound good too.
This is why I always recommend headphones. The built-in speaker works, but headphones let you hear faint changes in tone, quieter signals and little audio clues you might miss otherwise.
When you are starting out, dig plenty. Digging rubbish is not wasted time if it teaches you what rubbish sounds like on your machine.
What is discrimination?
Discrimination is a feature that allows your detector to ignore or reduce signals from certain types of target. Most beginners think of it as the “ignore rubbish” setting.
In theory, this sounds brilliant. Set the detector to reject iron, foil, ring pulls and other rubbish, then dig only treasure. If only life was that kind.
The problem is that good targets and bad targets can overlap. Some small hammered coins, gold rings, buttons, buckles and interesting artefacts can fall into ranges that beginners might be tempted to reject.
My honest advice:
Use discrimination carefully. It can make detecting quieter and less annoying, especially on trashy ground, but too much discrimination can cost you good finds.
If you are brand new, start simple. Do not reject too much until you understand what your detector is telling you. It is better to dig more junk early on and learn than to walk over good targets because your settings were too aggressive.
As you gain experience, you will learn when discrimination helps and when it gets in the way.
What is ground balance?
Ground balance is one of those settings that sounds boring until you detect difficult ground. Then you realise it matters.
Soil is not just plain dirt. It can contain minerals that affect the detector’s signal. Some ground is mild and easy. Some ground is mineralised and noisy. Wet salt sand is another challenge altogether.
Ground balance helps the detector reduce the effect of the ground itself, so it can focus more on metal targets and less on the mineral response from the soil.
Types of ground balance you may see
- Preset ground balance: The detector is factory set and you do not adjust it manually.
- Manual ground balance: You adjust it yourself to suit the ground.
- Automatic ground balance: The detector balances itself after you perform a simple action or command.
- Tracking ground balance: The detector continuously adjusts as the ground changes.
For a beginner, automatic or preset ground balance can make life easier. Manual ground balance gives more control, but it also gives you another thing to learn.
If your detector is unstable, chattery or constantly giving false signals, ground conditions may be part of the problem. Sensitivity may also be too high, or there may be electrical interference nearby.
How deep can a metal detector find things?
This is one of the most common beginner questions, and it is also one of the most annoying to answer properly.
The honest answer is: it depends.
I know that sounds like a cop-out, but depth depends on a whole list of things. Detector model, coil size, target size, target shape, soil conditions, mineralisation, frequency, settings, sweep speed and whether the target is lying flat or on edge all play a part.
| Factor | How it affects depth |
|---|---|
| Target size | Larger objects are usually detectable deeper than tiny targets. |
| Target position | A coin lying flat normally gives a better response than one standing on edge. |
| Ground conditions | Mineralised ground can reduce stability and usable depth. |
| Coil size | Larger coils may help with bigger deeper targets, but smaller coils can perform better in trashy areas. |
| Sensitivity | Higher sensitivity can help, but too much can make the detector unstable and reduce useful performance. |
| User technique | Poor sweep technique, lifting the coil or moving too fast can cause missed targets. |
Be careful with depth claims online. Air tests, where someone waves a coin in front of a coil, are not the same as real detecting. They can show that a detector is working, but they do not properly represent soil conditions, mineralisation, target ageing, moisture or all the awkward things that happen in the real world.
In the field, a stable detector used properly will often beat an unstable detector running flat out.
Why does a metal detector give false signals?
False signals are part of detecting, and they can drive beginners mad.
A false signal is when the detector gives you a response that seems like a target, but when you investigate, there is either nothing there or the signal disappears. Sometimes there was never a proper target. Sometimes the detector was reacting to ground conditions. Sometimes you moved the target without realising. Sometimes iron fooled you. Sometimes the machine was simply running too hot.
Common causes of false signals
- Sensitivity set too high.
- Mineralised soil.
- Wet salt sand.
- Electrical interference.
- Bumping the coil on stubble, stones or clods of soil.
- Loose coil cable.
- Rusty iron giving a false high tone.
- Poor ground balance.
- Sweeping too fast or unevenly.
If your detector is chattering like mad, do not instantly assume the machine is faulty. Lower the sensitivity a little, check your coil cable is secure, move away from power lines or electric fences, and make sure you are not knocking the coil on everything as you sweep.
There is no shame in turning sensitivity down. A quiet, stable detector is much easier to learn than a noisy one screaming at everything.
Why does rubbish sometimes sound like treasure?
This is the cruel joke of metal detecting.
If detectors could perfectly tell the difference between gold rings, hammered coins, foil, ring pulls and bits of lead, the hobby would be very different. Everyone would only dig the good stuff and fields would be cleared of treasure by lunchtime.
Unfortunately, metal objects can share similar signal characteristics. Gold rings can fall into the same sort of range as foil or pull tabs. Lead can sound lovely. Aluminium can sound far more exciting than it deserves to. Rusty iron can sometimes give a high-tone edge response that makes you think something good is hiding there.
This is why “dig it all” is common advice for beginners. It does not mean you must dig every microscopic iron grunt forever. It means that while you are learning, you need to dig enough targets to understand how your detector behaves.
The more you dig, the better your mental library becomes. Eventually, you will start to recognise certain sounds, shapes of signal and target behaviours.
How to check a signal properly
When you get a signal, do not just attack the ground straight away like a hungry badger. Take a few seconds to check it properly.
A simple beginner signal check
- Sweep over the target from one direction.
- Listen to the tone and look at the target ID.
- Turn 90 degrees and sweep over it again.
- Check whether the signal repeats both ways.
- Use pinpoint mode if your detector has it.
- Dig a neat plug or hole.
- Rescan the hole and the plug after recovery.
A strong two-way signal is usually more encouraging than a one-way chirp, but do not become too strict too early. Some good targets are awkward. Deep targets can be faint. Targets near iron can be masked. Small coins can give imperfect responses.
In the beginning, dig more than you think you need to. Experience is built with a spade, not just a screen.
Which settings matter most when you are new?
Modern detectors can have a lot of settings. Some are simple. Some are not. If you are brand new, do not try to master every setting on day one.
The main beginner settings to understand are sensitivity, discrimination, search mode, volume, ground balance and noise cancel if your machine has it.
| Setting | What it does | Beginner advice |
|---|---|---|
| Sensitivity | Controls how strongly the detector responds to signals. | Do not automatically run it at maximum. Stability matters. |
| Discrimination | Rejects or reduces certain target ranges. | Use lightly until you know what you might be missing. |
| Search mode | Preset programme for coins, relics, beach, field or similar uses. | Start with a beginner-friendly general mode. |
| Ground balance | Helps reduce interference from mineralised ground. | Use auto if available until you understand manual adjustment. |
| Noise cancel | Helps reduce electrical interference. | Run it when you arrive if your detector offers it. |
| Volume and tones | Controls how you hear target responses. | Use headphones and learn the audio properly. |
The worst beginner habit is changing too many settings at once. If the detector becomes unstable, you will have no idea what caused it. Change one thing, test it, then move on.
Think of your detector like a translator
A useful way to think about a metal detector is like a translator.
The target in the ground gives a response. The detector tries to translate that response into something useful for you: a tone, a number, a depth estimate or a visual display.
But like any translator, it can misunderstand things. A rusty nail might sound better than it should. A small silver coin might sound weaker than you hoped. A gold ring might sit in the same range as annoying rubbish. A deep coin might give a broken signal because the detector is only just catching it.
Your skill as a detectorist is learning when to trust the translation, when to question it, and when to dig anyway because something about the signal feels worth investigating.
Common myths about how metal detectors work
Myth: More sensitivity always means more finds
Too much sensitivity can make the detector unstable. A stable machine often performs better than one running flat out and chattering constantly.
Myth: Target ID tells you exactly what is in the ground
Target ID is a clue, not a promise. Depth, soil, shape, angle and nearby junk can all affect the number.
Myth: You should reject all low and mid tones
Some very interesting targets can sit in awkward ranges. If you reject too much, you can miss good finds.
Myth: Expensive detectors find everything
A good detector helps, but the person using it still matters. Research, permissions, technique and patience all play a huge role.
Myth: Air tests prove real depth
Air tests can be useful for learning tones, but buried targets behave differently in real soil conditions.
Myth: A good signal is always a good find
Some rubbish sounds beautiful. You will learn this very quickly, usually while holding yet another ring pull.
How to learn your detector faster
One of the best things you can do as a beginner is create a little test area at home. You do not need anything fancy.
Gather a few common targets: a modern coin, an old copper coin if you have one, a bit of foil, a ring pull, a nail, a piece of lead, a bottle cap and maybe a small silver item if you have one available.
Pass each one under the coil and listen to the sound. Look at the numbers. Turn the target. Move it closer and farther away. Put a nail near a coin and see how the signal changes. This teaches you more than reading ten arguments on Facebook ever will.
Try this simple test:
- Place a coin on clean ground.
- Sweep over it and listen to the tone.
- Check the target ID number.
- Turn the coin on edge and test again.
- Place an iron nail beside it and test again.
- Notice how the signal changes.
This is how you start to understand masking, target orientation and why real-world detecting is never as clean as a manufacturer video.
Summary: how a metal detector works in plain English
A metal detector works by sending an electromagnetic field into the ground through the search coil. When that field meets metal, the metal creates a response. The detector receives that response, processes it, and turns it into sounds, numbers and visual clues.
The detector is trying to help you work out what is beneath the coil, but it cannot be perfect. Target ID can be wrong. Junk can sound good. Good targets can sound iffy. Ground conditions can interfere. Depth estimates can be rough. Iron can be sneaky.
But that is also what makes the hobby interesting. If metal detectors told us exactly what everything was, there would be no mystery, no judgement and no buzz when you open a clod and see something old staring back at you.
Learn the basics. Keep the coil low. Swing properly. Listen carefully. Dig enough targets to build experience. Do not rely only on the screen. And remember, your detector is not just finding metal. It is giving you clues to history, one signal at a time.
Next beginner guide
Ready to choose your first detector?
Now you understand the basics of how a detector works, the next step is choosing one that suits your budget, your ground and the type of detecting you actually want to do.
FAQs about how metal detectors work
Can a metal detector tell exactly what metal it has found?
No. A detector can give clues based on the target response, conductivity, signal strength and other factors, but it cannot identify every object perfectly. Target ID numbers and tones are useful, but they are not guarantees.
Why does my detector beep when there is nothing there?
This could be caused by mineralised ground, wet salt sand, electrical interference, sensitivity being too high, a loose coil cable, rusty iron, or bumping the coil on the ground. Try lowering sensitivity and checking your setup.
Do metal detectors find all metals?
Hobby metal detectors can detect many types of metal, including iron, copper, brass, bronze, lead, silver and gold. How well they detect each target depends on the detector, settings, ground, target size and depth.
What is better, low frequency or high frequency?
Neither is automatically better. Lower frequencies are often better suited to larger and deeper targets, while higher frequencies are often more sensitive to small or thin targets. Multi-frequency detectors aim to give a wider balance.
Should beginners use discrimination?
Yes, but carefully. Discrimination can reduce unwanted signals, especially from iron, but using too much can cause you to miss interesting targets. Beginners should avoid rejecting too much until they understand their detector.
Why does my detector struggle on wet sand?
Wet salt sand can create a strong mineral response that confuses some detectors, especially basic single-frequency machines. Multi-frequency detectors and some specialist machines usually handle wet beach conditions better.
Sources and further reading
These links support the guidance above and provide further reading. Check country-specific rules where noted.
- Minelab UK: How metal detectors work: Explains electromagnetic fields, target ID, ground balance, frequency and VLF technology.
- Minelab UK: Using discrimination: Explains discrimination, target ID limitations and the effects of target shape, depth and soil.
- Minelab UK: How deep can a metal detector detect?: Covers depth factors including soil, target size, frequency, coil size and detector settings.